Erosion moves fast. Repair costs grow. You want a simple way to lock soil and rock in place. Can geocells handle your slope?
Geocells are HDPE honeycomb mats that confine infill on slopes. They raise shear resistance, stop downslope creep, improve drainage at the face, and speed installation with light tools and small crews.

Most owners ask the same things. Can I use geocells here? How do they work? How do I anchor them? What slope is too steep? I will walk through clear answers, practical ranges, and field steps that reduce risk and rework.
Slope shorthand note: “1V:3H” means 1 unit vertical for every 3 units horizontal (gentle). “1V:1.5H” is steeper. “1V:1H” means 1 up for 1 out (very steep). Smaller H = steeper.
Can geocells be used on slopes?
Slopes wash out. Soil slides after rain. You need control without building a full retaining wall.
Yes. Geocells work on many slopes. They add confinement and face stability. They hold soil, rock, or topsoil in place on cut, fill, and embankment faces.
Dive deeper
Where geocells fit
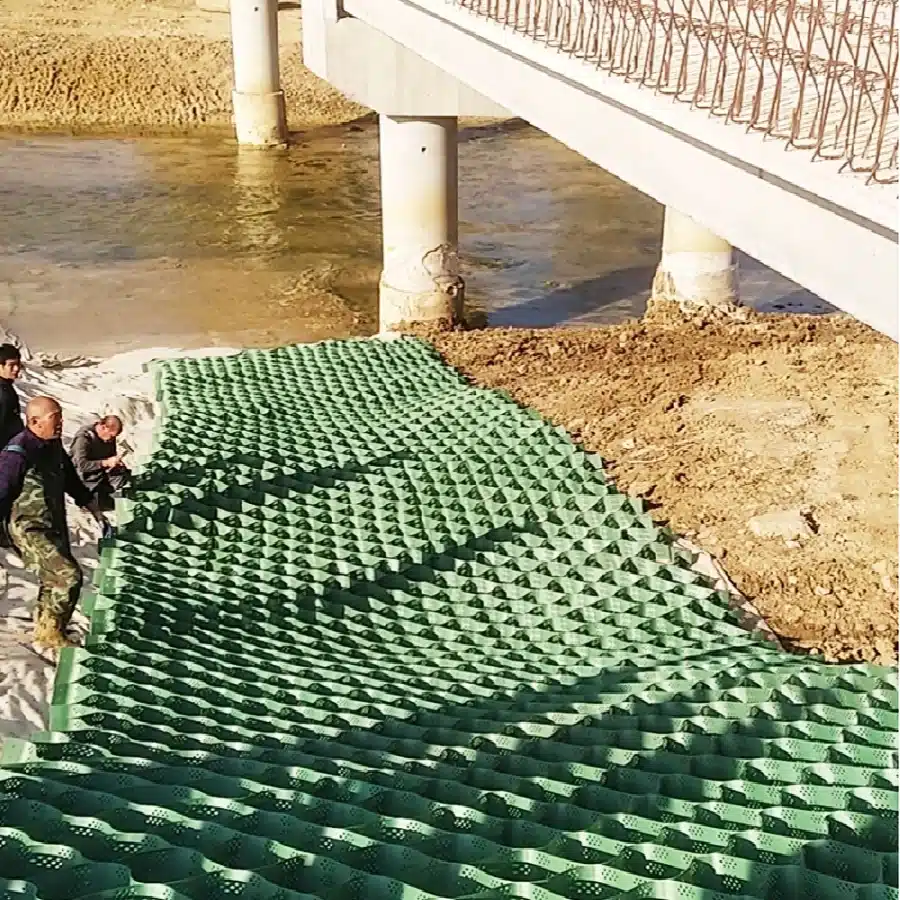
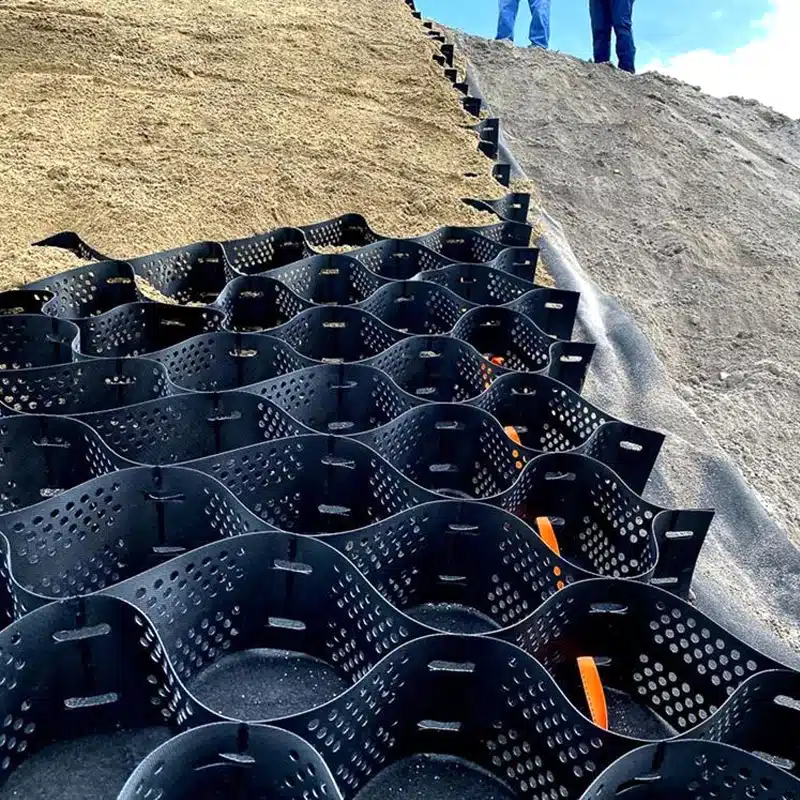
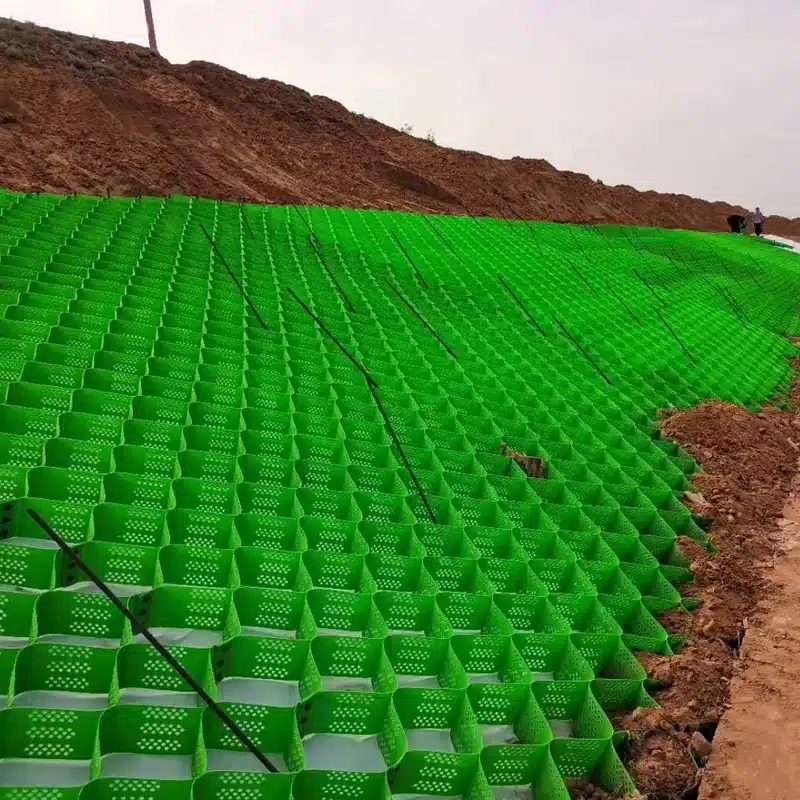
Geocells suit surface stabilization on natural slopes, road embankments, rail batters, pond and channel side slopes, and landfill covers. The honeycomb limits lateral soil movement. Each cell acts like a small crib that carries shear and helps the face resist sliding. Crews can place panels by hand on geotextile or prepared soil and fill them with topsoil, gravel, or rock. Vegetation can grow inside the cells. That adds root reinforcement and surface protection.
When to be careful
Very tall slopes with deep-seated stability issues need global stability checks. In those cases, geocells protect the surface but do not replace geogrid-reinforced soil or walls. Slopes with strong seepage also need drains to lower pore water pressure. Over smooth liners, you may need textured strips, tendons, and friction enhancement layers.
Typical use ranges
You can stabilize 1V:3H to 1V:1.5H slopes with geocells and common anchors. Steeper faces up to about 1V:1H are possible with tendons, crest trenches, and rock or concrete infill. For armoring against high-velocity flow (e.g., spillways), you will follow a hydraulic check and often use rock-filled cells or concrete infill.
| Site condition | Typical geocell height | Infill type | Notes |
|---|---|---|---|
| Vegetated slope, 1V:3H–1V:2H | 100 mm | topsoil + seed | Add erosion control blanket on top if windy |
| Road embankment, 1V:2H–1V:1.5H | 100–150 mm | crushed gravel | Use textured, perforated strips and crest trench |
| Channel side slope with moderate flow | 150 mm | rock 50–100 mm | Add filter geotextile and toe key |
| Steep batter near 1V:1H | 150–200 mm | gravel or rock | Add tendons and closer anchor spacing |
How does a geocell work for a slope protection?
You may see the honeycomb, but you want to know the real mechanics. Why does it hold?
Geocells confine infill. The walls create hoop tension. That tension resists downslope shear, spreads load, and turns loose fill into a semi-rigid skin tied back at the crest.
Dive deeper
Core mechanisms
1) Confinement and hoop tension. Soil in a cell wants to move. The wall resists expansion and develops tension like a belt. That adds apparent cohesion and raises shear strength along the face.
2) Interface friction. Textured HDPE increases friction between infill and cell walls. Perforations let small stone “key” through and add mechanical interlock across cells.
3) Membrane action. The geocell layer spans small weak spots. Loads distribute to neighboring cells, so local slip zones do not propagate.
4) Drainage at the face. Perforations and open joints let water travel laterally. That lowers uplift on the face and reduces hydraulic erosion.
What this means on the slope
At each slice parallel to the face, the confined mass has higher shear resistance than the same soil without the cells. When rain hits, the water can move across the face rather than build pressure behind a sealed skin. Vegetation roots inside each cell add binding over time. With rock infill, the cells act like many mini-gabions that resist rolling and sliding.
| Mechanism | Effect on slope | Practical choice |
|---|---|---|
| Confinement | Higher shear resistance | Smaller cell size on steeper slopes |
| Interface friction | Less downslope creep | Textured, perforated strips |
| Membrane action | Bridges soft spots | Maintain continuous layer, tight seams |
| Face drainage | Less uplift and piping | Perforations, open joints, outlets |
What is the best method for attaching geocell to a slope?
Anchors make or break the system. You want something simple and reliable.
Use a crest anchor trench first. Add mid-slope stakes or earth anchors. On steep or long slopes, thread tendons through cells and anchor them at the crest.
Dive deeper
Crest anchorage
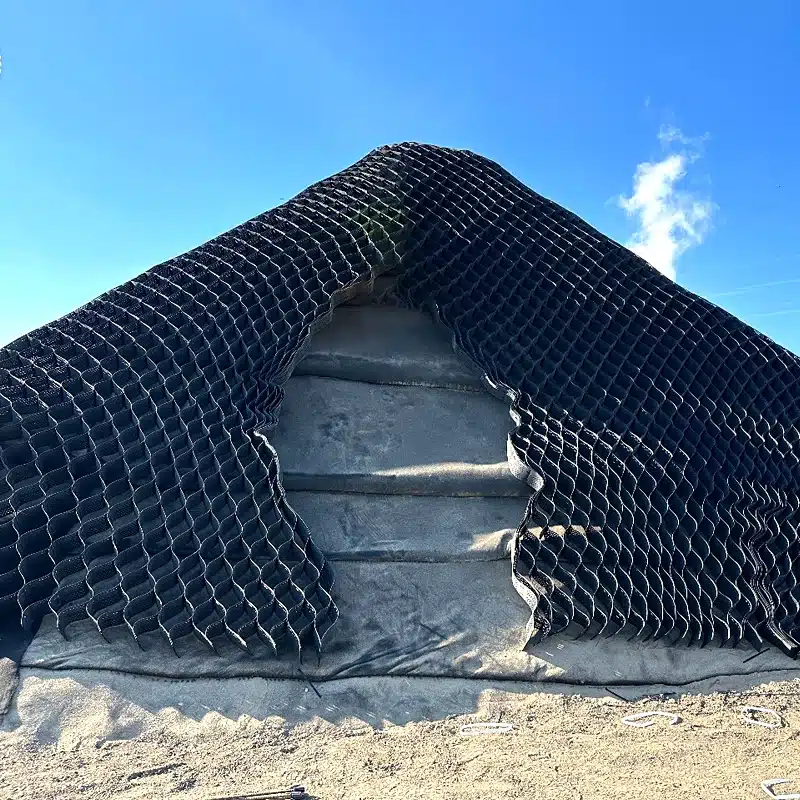
Cut a trench along the crest. Typical size is one cell deep and one cell wide. Place the first geocell row into the trench, backfill, and compact. This locks the layer and resists global downslope movement. If the slope meets a roadway shoulder, extend the cell layer under the shoulder or add a concrete beam to act as an anchor.
Mid-slope anchoring
Use J-pins, rebar stakes with washers, or duckbill earth anchors. Space them along panel seams and at centers. Closer spacing helps on steeper faces or in loose fills. Stake length should reach stable ground below the topsoil zone.
Tendons for steep faces
For slopes near 1V:1H or longer than 5–6 m, run polyester or aramid tendons through aligned cells. Fix the tendons at the crest with a deadman beam or a concrete anchor. Tie the tendons to the geocell using manufacturer clips or knots. Tendons carry part of the downslope component of weight.
Over geomembranes
If geocell sits over a liner, avoid sharp pins. Use ballast trenches, concrete curbs at the crest, friction layers (e.g., nonwoven geotextile), and mechanical anchors at edges where you can drill outside the liner zone.
| Slope angle | Primary crest detail | Mid-slope device | Typical spacing (both directions) |
|---|---|---|---|
| 1V:3H–1V:2H | Crest trench | J-pins 10–12 mm | 1.0–1.5 m |
| 1V:2H–1V:1.5H | Crest trench + edge beam | Earth anchors | 0.8–1.2 m |
| 1V:1.5H–1V:1H | Crest trench + tendons | Earth anchors + tendons | 0.6–1.0 m |
What is the maximum slope for geocell?
You want a safe limit. You also want room to adapt to soil and infill.
Most soil and gravel infills work well from 1V:3H to 1V:1.5H. With tendons, rock infill, and dense anchoring, faces near 1V:1H are feasible. Go steeper only with project-specific design.
Dive deeper
The practical limit depends on five things: soil strength, infill type, cell height, cell size, and anchoring system. On gentle slopes, topsoil in 100 mm cells with vegetation is common. As the face gets steeper, you increase confinement (smaller cells, 150–200 mm height), switch to gravel or rock infill, and add tendons. Hydraulic load changes the limit too. In channels or spillways, you design against uplift and drag, so you often use rock or concrete-filled cells and a robust toe key.
The face must also connect to something stable at top and bottom. A crest trench or beam stops creep from starting. A toe key or bench at the bottom stops undercutting. If your slope is taller than about 6–8 m, check overall stability with a geotechnical model and consider geogrid layers in the mass. In that case, the geocell provides surface protection while geogrids provide internal stability.
| Configuration | Typical workable slope | Infill | Notes |
|---|---|---|---|
| Vegetated cells, 100 mm | 1V:3H–1V:2H | topsoil | Add erosion blanket on top in windy zones |
| Gravel-filled cells, 150 mm | 1V:2H–1V:1.5H | 10–20 mm gravel | Perforated, textured strips; close anchors |
| Rock-filled cells, 150–200 mm | ~1V:1H | 50–100 mm rock | Add tendons; strong crest and toe details |
| Concrete-filled cells | steep faces or hydraulic | concrete | For spillways; structural check required |
What is the pros and cons of geocell for slope protection?
You want clear trade-offs. No surprises.
Pros: strong face stability, fast build, light logistics, good drainage, and green finish. Cons: needs anchoring, careful detailing on steep faces, and smart water management.
Dive deeper
Pros you can count on
Geocells confine infill and stop raveling. They allow vegetation to grow in cells, which improves aesthetics and biodiversity. Panels are light and compact, so crews can carry them on foot where access is tight. Perforations allow lateral water movement, which reduces hydrostatic pressure at the face. Installation is repeatable: crest trench, panel expansion, anchors, infill, and finish. Repair is simple; you can open a small patch and replace a panel without heavy equipment.
Cons to plan for
Anchoring details need care. On steeper faces, you must add tendons and a strong crest detail. If you ignore drainage, water can erode toes and edges. Over liners, you must avoid puncture and use ballast solutions. In freeze–thaw areas, you should use well-graded infill and provide outlets to avoid heave.
Cost and schedule
Geocells often cut haul and heavy equipment time. They reduce imported rock by using local soil where suitable. They also allow phased work: stabilize now and plant later. Budget for anchors, geotextiles, toe keys, and edge beams. These details are small compared to major earthworks, but they decide performance.
| Aspect | Benefit | Watch-out |
|---|---|---|
| Stability | Higher shear, less raveling | Crest and toe details are critical |
| Build speed | Light panels, simple steps | Crew training for first day |
| Drainage | Lateral flow through face | Provide outlets and toe protection |
| Aesthetics | Vegetation inside cells | Allow time for establishment |
How to install geocells on slopes?
A clean sequence prevents backtracking. You want consistent results across crews.
Prepare surface, place separator if needed, set crest trench, expand panels, anchor, connect seams, infill from the top, compact gently, and finish edges and drains.
Dive deeper
1) Surface prep. Remove loose debris and roots. Grade the slope to a smooth plane. If the subgrade is fine and wet, place a nonwoven geotextile as a separator and friction layer. Overlap 300–450 mm and pin the overlaps.
2) Crest trench. Cut a trench one cell deep and one cell wide. Place the first geocell row into the trench and backfill. Compact the trench fill so it locks the cells.
3) Panel layout. Place folded panels across the slope. Expand them to the design cell size. Use spreader bars or temporary stakes to hold alignment. Check a few cells with a tape to avoid over-stretch.
4) Anchoring and seams. Install J-pins, rebar stakes with washers, or earth anchors at the spacing in the plan. Add tendons on steep or long slopes and anchor them at the crest. Connect panel edges with keys, staples, or hog rings cell-by-cell to stop infill leakage.
5) Infill and compaction. Start at the crest and work downslope. Keep drop heights low to protect seams. Use angular soil, gravel, or rock per design. Compact in thin layers using a plate compactor. Do not run heavy rollers over exposed cell walls.
6) Finish and drainage. Shape the crest so runoff does not enter under the cells. Add a toe key or apron. Seed and mulch vegetated slopes. Place rock where vehicles may contact the face. Add check drains if the slope breaks into longer runs.
| Step | Key check | Common mistake |
|---|---|---|
| Crest trench | Depth and backfill compaction | Shallow trench that lets cells creep |
| Panel expansion | Cell size and alignment | Over-stretching panels |
| Anchors | Spacing and embedment | Using short stakes in loose soils |
| Infill | Low drop height, angular gradation | Dumping from high and damaging seams |
How to choose the right geocell for slopes?
Too many SKUs slow decisions. A short rule set helps.
Match height and cell size to slope and infill. Use textured, perforated strips for most soils. Add tendons on steep or long faces. Detail crest, toe, and drains.
Dive deeper
Inputs that drive selection
Soil strength, slope angle, slope height and length, design water loads, maintenance access, and desired finish (vegetation, gravel, rock). For gentle vegetated slopes, 100 mm cells with small geometry work well. For steeper faces or where equipment touches the slope, 150–200 mm cells give more confinement. Textured, perforated strips are the default because they raise friction and allow lateral drainage.
Simple rules of thumb
Use smaller cell geometry as slopes steepen. Use taller cells as soils soften or as faces get longer. Switch to gravel or rock infill where vegetation will struggle or where runoff is high. If the face is near a liner, use smooth underlayment fabric and avoid sharp anchors.
Purchase clarity
Write line items that include cell height, weld spacing (cell size), strip surface (textured or smooth), perforation (yes/no), tie strips or tendons (if needed), and anchor type. This avoids site RFIs and keeps deliveries aligned with the detail.
| Input | Choice | Why |
|---|---|---|
| 1V:3H vegetated | 100 mm, small cell | Enough confinement, easy planting |
| 1V:1.5H gravel | 150 mm, small/medium cell | Higher confinement for steeper face |
| Near liner | Smooth underlayer, no pins | Protect liner; use ballast edges |
| High runoff | Perforated strips, rock infill | Lateral drainage and weight |
My opinion
I usually suggest starting with water. If you control runoff, you win half the battle. Then match cell height and geometry to the slope and soil. Choose textured, perforated strips for most work. Anchor the crest, protect the toe, and plan outlets. Simple, repeatable details deliver stable slopes.
FAQ
Can I plant grass or shrubs in geocell?
Yes. Fill cells with topsoil, seed, and mulch. Use an irrigation plan for establishment.
Do I need geotextile under the geocell?
Use nonwoven geotextile on fine or wet subgrades and under rock to act as a filter and friction layer.
How close should anchors be?
Gentle slopes can use 1.0–1.5 m spacing. Steeper faces need 0.6–1.0 m and tendons. Follow your design table.
Will geocells work over a geomembrane?
Yes, with care. Use friction layers, crest ballast, and edge beams. Avoid puncture; do not drive pins through liners.
What infill is best for erosion control?
Vegetation for low to moderate flows, gravel for higher runoff, and rock or concrete for hydraulic armoring.
How long do geocells last?
Buried and covered, UV-stabilized HDPE has a long service life. Protect exposed edges from long sun exposure.
Can geocells handle freeze–thaw?
Yes, if you use well-graded infill and allow drainage paths. Avoid trapped water behind the face.
What maintenance is needed?
Inspect after heavy rain. Re-seat any loose anchors, top up infill at edges, and re-seed bare patches.
How do geocells compare to erosion blankets?
Geocells add 3D confinement and structural shear. Blankets protect the surface only. Many projects use both.
Are geocells recyclable?
HDPE is recyclable. Plan for offcut collection and responsible disposal or recycling.
Can vehicles drive on a geocell slope?
Occasional light traffic may cross rock-filled cells, but slopes are not driving surfaces. Use access tracks where needed.
Conclusion
Geocells stabilize slope faces with simple steps and light tools. Choose the right cell, anchor well, manage water, and fill with the right material. The slope will hold shape and stay green or armored as you planned.
MJY Geosynthetics Manufacturer has been dedicated to producing high-quality geosynthetic materials for 15 years and is a recognized leader in the industry. If you are interested in finding a reliable one-stop geosynthetics supplier for your project or business, please visit our website for more information: